
X-GPU Installation Guide (MBP 15'' 2011)
PRE-REQUIREMENT:
1. Disable the AMD GPU using the hardware method, there are various methods available online, such as Dosdude1 method and others. (this Kit is not tested with software disable method)
2. By all means this mod should be performed to a good working MacBook(disabled GPU), it is intended to add value to the Mac, not further downgrading it to a non-working state. So please make sure you are aware of your soldering capabilites and the requirement it takes to perform all these soldering steps successfully. We will not be responsible if you messed up your logic board.
X-WHISTLER SOLDERING STAGE (INTERNAL KIT)
1. Disassemble the MacBook,
2. Preheat the logicboard if you need to, mark/score the GPU borders to help X-Whistler placement later. Remove the AMD GPU with BGA rework machine. (just a side note, all GPU related circuits will not be used anymore - like VRAMs, and all GPU Power regulators)
3. Remove the lead free solder from the GPU footprints(on MLB) using wick. Make sure everything is flat and smooth as if youre going install new GPU chip.
4. Replace all the AC coupling capacitors for GPU with the supplied 0201 inductors. Total capacitors replaced : 32pcs. (PCIe x8 lanes)
5. Apply flux to MLB footprint, align X-Whistler(reballed with 0.4mm) adapter to the footprint following the GPU's border marking. Reheat the MLB on the BGA rework station with the leaded profile(depends on solder balls used).
6. Measure all diode mode on the X-Whistler, you will find the 1st Port (left), and 2nd port (right). The first port is the first x4 lanes, and the latter is another x4 lanes. Make sure the signal traces on the X-Whistler are not shorted/OL (typical 0.3, 0.4 diode). Only GPU SMBUS is OL (first Differential pair on the upper 2nd port)
7. If all diode values are good, only then solder both female IPEX connector to Port 1 & 2.
8. Rewire the EG_RESET_L. If you look at the boardview, EG_RST_L is connected from the GMUX to GPU. You need to cut/isolate this transmission line from the GMUX, and set a jumper directly to PLT_RST_BUF_L. So now the PLT_RST will send a signal directly to X-Whistler(without any interference from GMUX). The best way to cut the trace is around TP in diagram: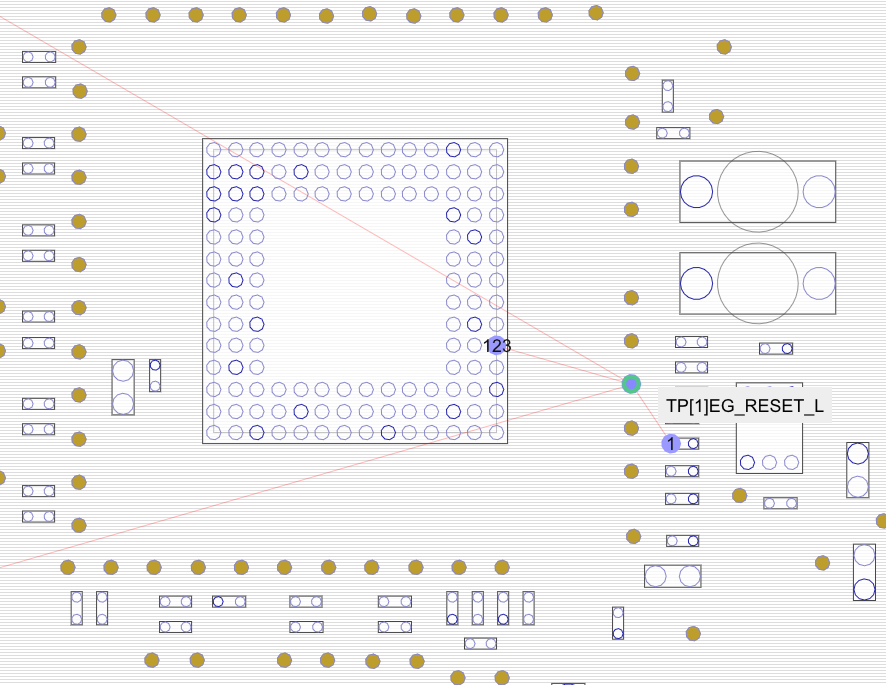
9. Activate clock request by jumping PEG_CLKREQ_L to GND
10. (Optional) perform heatsink mod by removing the GPU screw bracket. (more pictures to be added later). The bracket is removed using butane blowtorch. This heatsink mod is done because you might find the heatsink to touch the Male IPEX cable. We all know conductor's conductivity is changed if the conductor's temperature rises, etc.
11. Install both Male IPEX cable to Port 1 & 2 on the X-Whistler. Replace the CPU thermal paste and assemble the heatsink(If you removed the GPU bracket using blowtorch, you will be screwing only 3 screws to secure the CPU)
12. Soldering stage completed, you can install NevBolt-2 later if you want to.
DISTRIBUTION BOARD ASSEMBLY STAGE
1. Now we want to fit the Distribution Board to the DVD slot: Remove the DVD slot, remove the speaker/bass, remove the black plastic antenna attaching to the DVD slit with the help of IsoPropyl Alcohol. Detach the antenna unit from the black plastic. This single antenna will be reinstalled later.
2. Cut a small portion of the Speaker's plastic. This is to fit the PCIe x8 connector to the DVD slit. Dont worry, its not the real speaker coil/circuit, I think its just a sound chamber to enhance the sound of the right speaker(no difference after cut though, honestly). So after cutting that one small part, reseal the opening by melting the plastic using the soldering iron tip, or simply use glue.
3. Reinstall the speaker/bass, then install the Distribution Board, and it should fit really well inside the chassis. screw both bolts to the DVD screw holes, and begin to assemble the MLB into the chassis.
4. Make sure to identify the Male IPEX First Port(left) and Male IPEX 2nd Port(right). Plug in both of them to the respective ports on the DB board(labelled). DO NOT misplugging them on the wrong ports. And make sure to not confuse with the cable coming from the NevBolt-2 (NVMe)
5. Measure all the diode value on the DB Board, as usual, no short/OL. Measure both R2D and D2R side to the PCIe x8, make sure they have 0.3/0.4 value.
6. Yes, you need to do several adjustment to the IPEX cables to fit the MLB into the chassis properly. Take advantage of the spaces available between the large inductors, capacitors on MLB. Slight bending of the MLB is fine.
7. Plugin all cables, trackpad, battery, LCD, keyboard, and make sure the MacBook is able to turn on/boot, if it doesnt able to turn on, maybe something is shorted, check again what we modified, like PLT_RST, etc.
8. The single antenna from the DVD just now can be fit directly below the Airport Card. We attach the antenna using double tape.
X-GPU RISER SETUP (EXTERNAL KIT)
1. This external kit is intended for mounting inside the Mini ITX chassis, the criteria to choose the ITX is dependent on your GPU's dimension. If you can fit your GPU and SFX PSU inside your choosen ITX, all good to go. You can even run this kit on the table without any ITX. tested: B2 Plus ITX, Geeek A50s,
2. Plug in the X-GPU Riser to GPU of your choice, full list GPU compatibility at Dortania
3. Plug in the PCIe Power Board to all cables on the X-GPU Riser (12Volt red yellow, and 3.3v PSON)
4. Plug in your 24 Pin PSU to the 24 Pin connector, minding the notch side. (for PSU watt, we are able to run RX6900XT from a bronze 450W SFX PSU - Silverstone SFX, you can buy better PSU if you want. 450Watt is enough because you will be powering only the GPU, nothing else)
5. Plugin 12Volt PCIe from your PSU to the GPU power ports. Use the supplied 12Volt CPU-PCIe converter if you want to convert the 12V from the PSU CPU phase.
X-GPU USAGE AND MAINTENANCE
1. This X-GPU setup should be treated like a normal PCIe card, so you need to make sure to plug the X-GPU cable into the MacBook ONLY when everything is shut off(MacBook S5 state, PSU off)
2. DO NOT remove the X-GPU during operation, it will cause fatal error just as you remove GPU from a PCIe port(on PC/ Mac Pro)
3. When charging the MacBook, make sure to use the Long Cable(not the duck plug). The short Duck plug was known to interfere with PCIe signal before.
4. The X-GPU is fully integrated with the MLB, so when you turn the MacBook, the X-GPU will also turn on.
5. When your MacBook enters sleep mode, the X-GPU will also power off to save power(sleep state support)
6. When the MacBook is turned off, the X-GPU will disengage the PSON signal, so the PSU will also be turned off(so you dont have to turn of the PSU power manually)